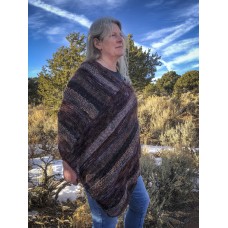
Sample knitted in colorway Earth
|
Supplies:
- 1 Skein Cat Mountain Fiber Arts (750 Yards/approx. 12 ounces per Skein)
- 5.5 mm/US Size 9 circular needle, 90cm/36inch or longer
- Optional – A set of straight or double pointed needles in the
same size; I find this easier to use on long bind offs and for applied I-Cord
- Gauge – Approximately 16 Stitches and 14 Rows over 4 inches worked in Stockinette Stitch
Gauge is not extremely critical, as there is plenty of yarn to make a large poncho. Work your swatch and determine your needle size such that you are pleased with the feel and drape of the fabric.
The finished poncho shown in the photo is a rectangle that
measures approximately 62 by 22 inches, with the short end
wrapped around and seamed to the lower half of the long
edge. This was knit to the specified gauge and the
instructions below. The model is a US Women’s size 12-14,
and about 5’7” for reference of how this fits. You may
choose to reduce the width or length to make it smaller, and
there is enough yarn in the skein to make it just slightly
larger if desired. The size shown used about 675 yards.
This cozy poncho is a quick knit on a size 9 needle. The textured yarns are brilliantly shown off in the knitted strips
of stockinette and reverse stockinette. The applied I-cord on each edge gives the garment an attractive finish. The
sample was knit in the colorway “Earth.”
Instructions:
- Lay out the ten balls that comprised your Fusion skein, and choose one of the balls to be used for the Applied I-cord
border (I suggest you use one of the smooth ones, as this will make a nice even edge.) The remaining 9 balls will be
used for the main body of the poncho.
- Loosely cast on 210 stitches using long tail cast on, or your favorite cast on method.
- Rows 1-8: Work Stockinette (Knit 1 row, Purl 1 row) Change Yarn
- Rows 9-16: Work Reverse Stockinette (Purl 1 row, Knit 1 Row) Change Yarn
- Continue as above, knitting stripes of 8 rows each, alternating stockinette and reverse stockinette, changing yarns
after each stripe.
- Work until 13 stripes are completed. After the first nine stripes, you will need to combine yarns to get a full stripe
as there will not be enough of a single type of yarn left in each ball for a full 8 rows. As mentioned, you will likely
have enough total yarn for an additional stripe if desired.
- After Row 8 of the final stripe, bind off all stitches loosely.
- Block the rectangle before seaming. Both sides look very similar, so there is no front or back side, unless you like
one better than the other. With mattress stitch, seam the short edge to the lower portion of the long edge with your
chosen “back” sides facing, beginning the seam at the corner of the work.
- An applied I-Cord edge is worked onto the neckline and the hem of the poncho. In both cases, begin on the back
side of the garment (so that the seam point is not visible right in the front). The Applied I-Cord is worked as
follows: Cast on 3 Stitches to the right hand needle. Pick up one stitch from garment edge with the left hand needle,
and slide the three cast on stitches from the right hand needle to the left so that there are 4 stitches on the left needle,
including the one that was picked up. Knit 2, Slip 1, Knit 1, Pass Slipped Stitch Over. 3 Stitches remain on the right
hand needle. Repeat this process – picking up one stitch with the left needle, sliding the 3 from the right needle
over, working Knit 2, Slip 1, Pass Slipped Stitch Over, all the way around the neckline and hem until all stitches
have been picked up. Cast off the last row of I-cord and neatly seam to the cast on point.
- Most parts of the garment it will be easy to see the stitches to pick up as it is either a cast on or bind off edge and
you will pick up one stitch for each loop. A small portion will be the side edge of the knitting, and in this area, pick
up stitches across the side edge as evenly as possible.
Weave in ends. Wear and look stylish and beautiful!
|
|

